Copyright Information

The design work, text and photographs on this site are copyright by The Craft Bin, LLC. This information is shared to inspire you. All content on this site is not to be used for commercial purposes without explicit permission. Thank you so much for your support!

Blogroll

Custom Web Applications

Monday, December 29, 2008

"C" is for Cherished

This is the third page of an ABC album for a cherished baby girl.

In this layout, you can place a 4" x 6" photo at the top.

At the bottom, I first sewed bottom and 2 outer sides and also a straight line between each circle. That way, you can insert 3 smaller photos into the slots.

At the bottom, there is supposed to have a cute phrase of "Your are a treasure to cherish always." But I messed it up by typing "is cherish" instead. But I didn't realize that until now. So if you are going to make this page layout, please don't make the same mistake as me. Have fun!!!!

Items used in this layout include:

1. Chatterbox's Villa Memory Building Kit
2. Chatterbox's Olive fuzz stickers
3. Chatterbox's Olive 3-D stickers
4. Heidi Swapp's Pink Chipboard Alphabet Box
5. Heidi Swapp's red, pink and lemonade felt flowers.


Saturday, December 27, 2008

Organizing Spellbinders Dies

Today I want to share a great solution I found for Spellbinder Dies.

I have been using CD cases to store my Spellbinders for a while but I didn't quite like the solution. The first problem was that I couldn't fit long rectangles dies into a CD case. Also with the number of CD cases I had, a lot of times they would fall off when I transported them from the house to a crop.

Then I found Tim Holtz's stamp binder. The dimension of the pocket is 7" w x 8.5" h, I can definitely fit the long rectangle dies and curved rectangle dies in there without any problem.

To keep them from shifting, I then found some avery inkjet printable magnetic sheets sold at Sam's Club's website for $7.88 with shipping fee included. That saved me a trip to the store... :)

Each package of magnetic sheets comes with 5 sheets. I cut each sheet in half and trim off the long side to be 8" long and they fit perfectly in the pockets. So I can store 10 sets of Spellbinder Dies. I then printed out their item number and name of dies on address labels and stock them on the magnetic sheets. See how neatly they stored in this cute binder.

Inside of the binder also has a front pocket and that's where I keep my tan embossing mat and white spacer plate and instruction sheet.

Here is great thing about this binder. It comes with a zipper so when I am done with these dies, I just close the zipper. Voila...they are safely kept inside the binder.

Not only I can keep Spellbinders Dies in this binder, I can also keep my clear stamps, stickers sheets, stencils,..., etc. I just love it.

Here is another tip for organizing Spellbinders Dies. I don't know about you but when I scrapbook, I love to take out all my tools and accessories. But when I am done, it's difficult to separate Spellbinders Dies into their own sets. So when I get a new set of dies, I use marker to label them in the back with the item number and die number with the largest one as 1 and second largest one as 2, and so on. That way, it's easy to sort them.


For Scalloped Square Dies, because these dies overlapped with each other, you can not nest them together on the magnetic sheet. You have to alter the sizes and keep in 2 separate piles like below.

Thursday, December 25, 2008

"B" is for Baby

"Have you ever held a baby, a baby, a baby like this?"

Continue with the baby girl ABC album, this is another cute 12" x 12" page layout I made using Chatterbox's Villa Memory Building Kit, olive ribbons and Heidi Swapp's Pink Chipboard Alphabet Box, large floral and baby chipboard.

Wednesday, December 17, 2008

"A" is for Angel

I have been wanting to make an ABC baby album and finally I got some time to do so. I will share this ABC album with you as I complete them one page at a time and I hope you will be patient with me.

This is 12x12 album made for a baby girl. I started with Chatterbox's Villa Memory Building Kit, which features pink and olive color with floral, stripes and plaid pattern. For the ABC alphabets, I chose Heidi Swapp's Pink Chipboard Alphabet Box. These Chipboard Alphabet are about 2" tall so they will definitely give my pages a pop.

To make the letter "A" stands out more from the pastel background, I built a layered flower from Heidi Swapp's large floral and felt flowers and jeweled brad and use it as the background.

I also tie an angel chipboard to the letter "A" to emphasize "A" is for angel. Because this angel tag is not glued down, you can add a short message to the back of the tag if you want to.

You can place a 4" x 6" photo and a 4" x 4" photo or journaling block. These 2 mats were first cut with Fiskars's Paper Edgers, then sewed together and added pink ribbons.

To tie the olive chipboard alphabets "ANGEL" with pink, I sanded them down a little before applying Stampin' UP! Rose Romance ink around each alphabet.

At the bottom of page, I added a clear die cut wing from Heidi Swapp with a 3-D angel sticker from Chatterbox to start a cute little phrase "Angel is God's whisper in the wind". This phrase was printed on a piece of cardstock cut and embossed with Spellbinder's small rectangle die with a background cardstock cut and embossed with large rectangle die. The clear die cut wing is also inked with the same Stampin' UP! Rose Romance ink in the back. I hope you like this cute baby girl layout. I am sure that it can be easier converted to a baby boy layout by simply changing the color.


Sunday, November 23, 2008

Create 20 Chrismtas Cards in One Night

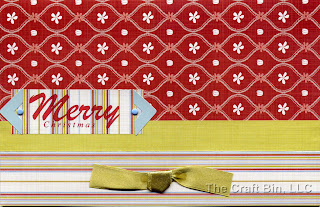
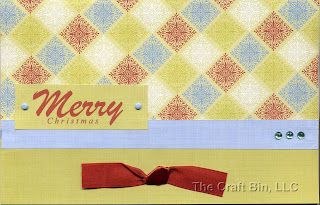
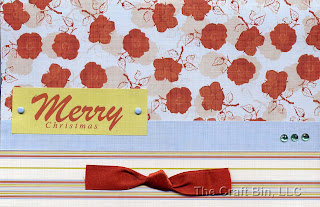
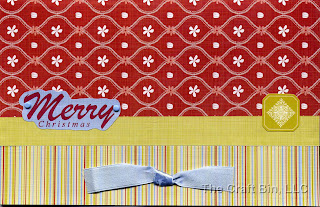
Can you believe that I made all 20 of these Christmas Cards in one night? Yep, I did. How cool is it to have all your friends and family received different cards from you this Christmas. And I didn't use any stamps, other embellishments or fancy tools for these cards. All the stickers, alphabets, flowers and ribbons are from this Page Kit. The only thing that is not included in this kit is the 8.5" x 11" cream cardstock.


List of supplies and tools for this project:

Cardstock and Paper
- Gazebo Memory Building Page Kit by Chatterbox
- 20 8.5" x 11" cream cardstock

Tools:
- Paper trimmer
- Scissor
- Tapes


Instruction:

1. First, follow the dimensions below and cut 4 of 12" x 12" paper each. So you will have
  • 20 of A with 3.5" x 8.5" dimension
  • 24 of B with 1.75" x 8.5" dimension
  • 16 of C with 0.75" x 8.5" dimension
  • 8 of D with 3.5" x 3.5" dimension


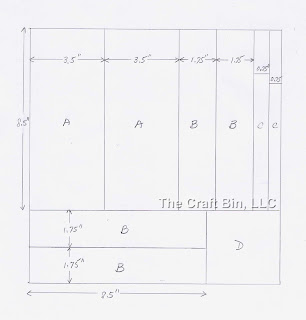
2. Then cut 2 pieces of B with dimension of 0.75" x 8.5" dimension. Now you should have 20 of A and 22 of B and 20 of C.

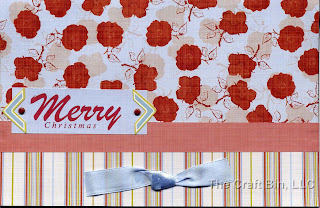
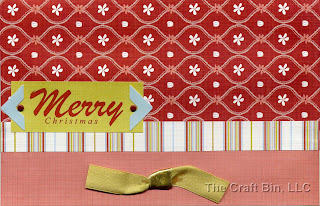
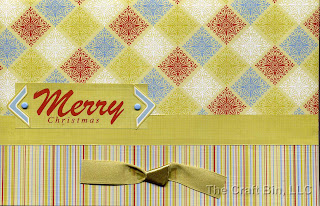
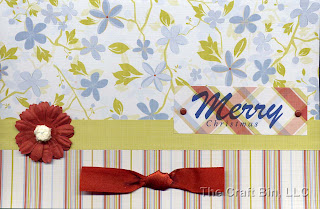
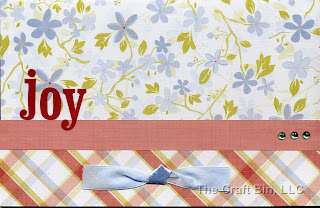
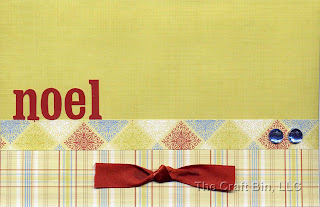
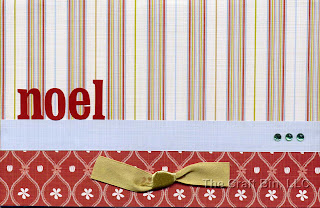
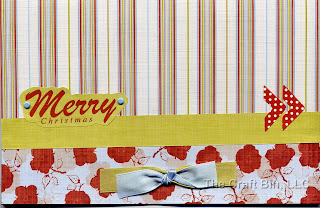
3. Now you can take 20 of A, B and C to assemble 20 cards. Each card will need one each of A, B and C. Make sure you lay out all 20 combination first before tape it down to the card. It's much easier to switch them now than with tape in the back. Also, remember that these paper are double-sided, so you can flip them over if you think the pattern is too busy. You see, there are just so many different possibilities with these. You will start tape B at the bottom of the card, A at the top of the card and then C to cover the gap between A and B.

4. Cut the ribbons came with the kit to 5" long. Tie a knot and tape them to the bottom of the cards.

5. Use the alphabet stickers came with the kit, make 2 cards with title "joy", 2 cards with "noel" and 1 card with "peace".


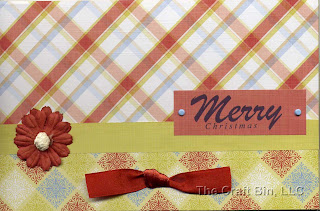
6. Download (right click on the image and select "Save Image As...") the 2 images above, and print them on the D (3.5" x 3.5") paper. Make sure you adjust the print size to 3.5" x 3.5". If you have problem print them out on 3.5" x 3.5", you can tape them to a larger piece of paper and them peel them off after printing. Trim them down and use them as titles for the rest of 15 cards. Use brads that came with the kit to attached to the titles.

7. Use stickers and flowers that came with the kit to embellish the cards. Voila, here are 20 homemade Christmas Cards!

Saturday, November 22, 2008

Red, White, Blue Christmas Card

Today, I want to a share a card with you that was made specially for our brave soldiers who can not spend time with their family during holiday season.


Here is the list of supplies and tools you will need to make this card:

Die Set(s):
- Star 5 Die Set by Spellbinders

Stamp(s):
- A Rhonna Christmas Card Stamps by Autumn Leaves

Cardstock and Paper
- 8.5" x 11" white cardstock
- 4.5" x 4.5" blue cardstock
- 4 1/8" x 4 1/8" light blue cardstock
- Enough red, white, blue cardstock to cut 4 red stars, 4 blue stars and 5 white stars.

Embellishment:
- Scarlet Decorative Ribbon by Chatterbox
- Denim Decorative Ribbon by Chatterbox
- Brads by Making Memories

Ink
- Real Red Pigment Ink from Stampin' Up!

Tools:
- Wizard byby Spellbinders or other die cut systems that are compatible with Spellbinders Dies.
- Paper trimmer
- Scissor
- Tapes
- Silver pen


Instruction:
1. I started with the smallest star die from Star 5 Die Set to cut out 4 red stars, 4 blue stars and 5 white stars first. Then assembled them on the light blue card stock to make a star wreath. Tip: I use one of Spellbinders circle dies as a template to draw a circle on the light blue cardstock first so I can make sure that the stars are in a perfect circle. You can use any object that can help you to draw a circle that is about 2.5" in diameter.

2. Attached some Blue Decorative Ribbon and Red Decorative Ribbon to the card with blue brads.

3. I stamped the Happy Holidays on the left side of the card between ribbons. Added some shadow with a silver pen to the stamped image so it stand out more.

4. Attached blue card stock and then the assembled light blue card stock to the card.

5. Added some red brads to the 4 corners of star wreath for finishing touch. Here is a card for our soldiers and wish them a Holiday Holiday!

Friday, November 21, 2008

The "GREEN" Star Christmas Card

Ok, I did promise you that I will show you another Christmas Card from the left over star die cut a few days ago. So here it is. In this card the main theme, Star, is all made of recycle paper. This is the "Green" Star Christmas Card.


Here is the list of supplies and tools you will need to make this card:

Die Set(s):
- Star 5 Die Set by Spellbinders.
- Label 2 Die Set by Spellbinders.

Stamp(s):
- A Rhonna Christmas Card Stamps by Autumn Leaves

Cardstock and Paper
- 8" x 11" cream cardstock
- Some left over scrap paper and a piece of 5" x 5" paper that will coordinate with the scrap
- Left over Silver Star from Shining Star Christmas Card or Silver paper from Creative Memories Metallic Collection.

Embellishment:
- Scarlet Decorative Ribbon by Chatterbox
- Jeweled Brads by Heidi Swapp

Ink
- Real Red Pigment Ink from Stampin' Up!

Tools:
- Wizard by Spellbinders or other die cut systems that are compatible with Spellbinders Dies.
- Scissor
- Tapes
- Silver pen


Instruction:
1. First, I glued all scrap paper on a piece of paper that is large enough for me to cut out a star die cut using the third largest star die from Star 5 die set. I used mostly with shades of green paper and then add a little yellow and red pattern paper.

2. Take the glued paper with the star die and run through Wizard. Then glue it to the Silver Star die cut. If you don't have one, you can use the second largest star die and cut and embossing on a silver paper.

3. I used the largest die from Label 2 Die Set and cut and embossing on a red card stock to pick up the reds in my assembled star. I then use the same die and a template to outline silver border.

4. I stamped the Merry Christmas on the lower left hand corner of the card and used a silver pen to add some shadow to the stamped image to make it stand out more.

5. I added Scarlet Decorative Ribbon on the cream card stock first before attached the label and star die cuts. Finished it with some small sparkle Jeweled Brads from Heidi Swapp. Here is your "Green" Christmas Card.

Sunday, November 16, 2008

Shining Star Christmas Card

Remember the lyric "hang a shining star upon the highest bow"? Well, here is a Christmas card with a shining star upon the highest bow. It's easy and simple to make.


Here is the list of supplies and tools you will need to make this card:

Die Set(s):
- Star 5 Die Set by Spellbinders

Stamp(s):
- A Rhonna Christmas Card Stamps by Autumn Leaves

Cardstock and Paper
- 7" x 11" white cardstock
- 5" x 6.5" red cardstock
- Silver paper from Creative Memories Metallic Collection.

Embellishment:
- Scarlet Decorative Ribbon by Chatterbox
- Jeweled Brads by Heidi Swapp

Ink
- Basic Black from Stampin' Up!

Tools:
- Wizard by Spellbinders or other die cut systems that are compatible with Spellbinders Dies.
- Paper trimmer
- Scissor
- Tapes
- Silver pen


Instruction:
1. I used the largest star die from Star 5 die set to cut and emboss the star. Then I used the 2nd largest die to cut out the inside of star. To ensure that the die does not move while I was cutting, I use a very small piece of scotch tape to tape 2 corners of star and then remove the tape carefully after cutting. Now you have a silver star frame. Don't throw away the smaller star. I will show you another card make of the smaller star in the next couple of days.

2. I used the star frame as the template to mark on the white card stock on where I wanted to do the horizontal cut and also the triangle cut.

3. I used paper trimmer to make the horizontal cut and then used a pair scissors to cut the triangle out.

4. I attached the star onto the white card stock.

5. I stamped the 'tis the season on a red card stock and used a silver pen to add some shadow to the stamped image to make it stand out more.

6. Add some Scarlet Decorative Ribbon and a big sparkle Jeweled Brads from Heidi Swapp and that was it.

Have fun with this easy and elegant Christmas Card!

Sunday, November 9, 2008

Spellbinders - Turkey Die Cut 2

Here is an alternative to the Turkey Die Cut 1.


Step 1: Cut and embossed 3 different sizes of scalloped oval die cuts. Here, I use the 3rd, 4th and 5th largest dies from Petite Scalloped Large Die Set. Glue them together.

Step 2: Use the 3rd and 6th largest die from
Small Standard Circles Die Set to cut 2 circles with cream cardstock. Glue them together with the feather die cut from the previous step.


Step 3: Free hand cut the beak and feet with yellow cardstock. Glue them to the die cut and draw eyes with black pen. Here is another cute little Turkey Die Cut for your scrapbook pages and cards.

Spellbinders - Turkey Die Cut 1

Today, I will show you step by step on how to create this cute little turkey die cut for your scrapbook pages or cards.


Step 1: Cut and embossed 3 different sizes of scalloped oval die cuts. Here, I use the largest 3 dies from Petite Scalloped Large Die Set. The largest one with brown cardstock, the second largest one with orange cardstock and the third largest with cream cardstock. Glue them together like the picture shown on the left


Step 2: Turn the die over and draw a vertical and horizontal lines so you can find where the center is. Then draw 2 angled lines from and center toward the bottom like the picture shown here.


Step 3: Cut the angles line so now your die cuts will look like this.


Step 4: Now cut a circle with brown cardstock. I use the third largest die from
Small Standard Circles Die Set. Then I use the 6th largest die from the same set to cut a circle with cream cardstock. Glue them together with the feather die cut from the previous step.


Step 5: Free hand cut the beak and feet with yellow cardstock. Glue them to the die cut and draw eyes with black pen. Here is your finished product. Isn't it cute?


Sunday, November 2, 2008

Spellbinders - Pumpkin Die Cut

Did you have a nice Halloween? Here is a easy way to create a pumpkin die cut using Spellbinders Circle Die that you can use for Halloween page.

1. Create 3 circles using the same Spellbinders Circle Die. I use the 3rd smallest die from Small Standard Circle Die Set.


2. Draw 2 curve lines on the first circle like the picture shown here. I use dotted line, but you can use solid line if you prefer.


3. Attach the other 2 circles at the bottom of the first circle like picture shown here. I put the middle circle slightly lower than the outer circle. Then draw dotted line along the middle circle line. Draw the stem, a leave and a couple of vines using a green pen

Wednesday, October 22, 2008

Spellbinders: Nestabilities Dies - 2 - The Sizes


Today we will go over different sizes of Nestabilities Dies.


Each set of Nestabilities Dies comes with 5 to 7 dies and each die is approximately 1/4" smaller than the previous one. So you can create frames with 1/4" borders with these dies easily. But what happen if you need to create 1/8" borders? Don't worry, Spellbinders thought of that. For each shape (circles, ovals, rectangles, squares and long rectangles) of Nestabilities, it has one large set and one coordinated small set of dies.

In the picture to the left, the top one shows Petite Oval Large Dies and the bottom one shows Petite Oval Small Dies. They are almost identical, except the small set is 1/8" smaller than the large set. So if you have both large and small sets, they will cover more intervals. But if you don't need that flexibility, then one set should be sufficient for your scrapbook or craft projects.


For each shape of Nestabilities Dies, it also offers the coordinated scalloped dies. With both non-scalloped edge and scalloped edge dies, you can create very pretty scallaped edge frames. The scalloped edged dies also comes with large and small sets. Some of you have asked which one you should get if you can only buy one set. Well, this is all depends on what is your preference. Here I am showing 2 pictures. The top one is using a Petite Oval Small Die with a Petite Scalloped Large Die. This combination offers wider border.


The bottom one is using a Petite Oval Large Die with a Petite Scalloped Large Die. This combination offers narrower border. So both combination are equally pretty and it's really depends which one you like better when you choose a scalloped edge die.

Wednesday, October 8, 2008

Spellbinders: Nestabilities Dies - 1 - The Basics

For someone who is new with Nestabilities Collection by Spellbinders, it can be very overwhelming and confusing. How does it work? What is the difference between large and small circles? Which scalloped ovals work with the petite ovals? So I will try to answer some of the questions for the next few weeks. Today, let's go over the the basic information about these Nestabilities Dies.

First, let's take a look at these Nestabilities Dies. One side of these dies have ridge and the other side is flat, as shown in the first 2 pictures. The first one is the largest die from Petite Oval Large Set and the second one is the largest die from Petite Scalloped Oval Large Set. The ridge side is the cutting side. When you run these dies through a machine, you want to put the ridge side against the cardstock. Please refer to Spellbinders: Die Cut Machine Capabilities check the correct cutting and embossing sandwich for your machine.

I built the cutting sandwich with the Petite Oval Large Die and ran through my machine. After I completely ran it through and peeled away the perimeter scrap surrounded the die cut image, this is what I got. If I also want to emboss the die cut, I will then take the die with the die cut attached, built the embossing sandwich for my machine and ran it through the machine again. Tip: If you want to emboss your die cut, after its cut, DO NOT PEEL the die cut away from the die before you emboss, otherwise it will be very difficult to line up and build the embossing sandwich.

I repeated the same process with the next largest die from Petite Oval Large Set with brown cardstock. Now I can layer the brown die cut on top of the cream one and build a nice oval die cut.