


Wednesday, October 22, 2008
Spellbinders: Nestabilities Dies - 2 - The Sizes


Wednesday, October 8, 2008
Spellbinders: Nestabilities Dies - 1 - The Basics
For someone who is new with Nestabilities Collection by Spellbinders, it can be very overwhelming and confusing. How does it work? What is the difference between large and small circles? Which scalloped ovals work with the petite ovals? So I will try to answer some of the questions for the next few weeks. Today, let's go over the the basic information about these Nestabilities Dies.
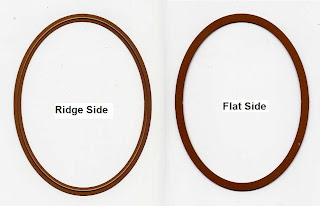
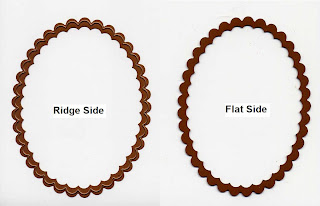 First, let's take a look at these Nestabilities Dies. One side of these dies have ridge and the other side is flat, as shown in the first 2 pictures. The first one is the largest die from Petite Oval Large Set and the second one is the largest die from Petite Scalloped Oval Large Set. The ridge side is the cutting side. When you run these dies through a machine, you want to put the ridge side against the cardstock. Please refer to Spellbinders: Die Cut Machine Capabilities check the correct cutting and embossing sandwich for your machine.
I built the cutting sandwich with the Petite Oval Large Die and ran through my machine. After I comp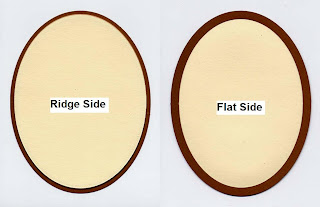 letely ran it through and peeled away the perimeter scrap surrounded the die cut image, this is what I got. If I also want to emboss the die cut, I will then take the die with the die cut attached, built the embossing sandwich for my machine and ran it through the machine again. Tip: If you want to emboss your die cut, after its cut, DO NOT PEEL the die cut away from the die before you emboss, otherwise it will be very difficult to line up and build the embossing sandwich.
I repeated the same process with the next largest die from Petite Oval Large Set with brown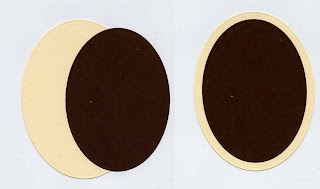 cardstock. Now I can layer the brown die cut on top of the cream one and build a nice oval die cut.

 First, let's take a look at these Nestabilities Dies. One side of these dies have ridge and the other side is flat, as shown in the first 2 pictures. The first one is the largest die from Petite Oval Large Set and the second one is the largest die from Petite Scalloped Oval Large Set. The ridge side is the cutting side. When you run these dies through a machine, you want to put the ridge side against the cardstock. Please refer to Spellbinders: Die Cut Machine Capabilities check the correct cutting and embossing sandwich for your machine.
I built the cutting sandwich with the Petite Oval Large Die and ran through my machine. After I comp
 letely ran it through and peeled away the perimeter scrap surrounded the die cut image, this is what I got. If I also want to emboss the die cut, I will then take the die with the die cut attached, built the embossing sandwich for my machine and ran it through the machine again. Tip: If you want to emboss your die cut, after its cut, DO NOT PEEL the die cut away from the die before you emboss, otherwise it will be very difficult to line up and build the embossing sandwich.
I repeated the same process with the next largest die from Petite Oval Large Set with brown
 cardstock. Now I can layer the brown die cut on top of the cream one and build a nice oval die cut.
Subscribe to:
Posts (Atom)