Copyright Information

The design work, text and photographs on this site are copyright by The Craft Bin, LLC. This information is shared to inspire you. All content on this site is not to be used for commercial purposes without explicit permission. Thank you so much for your support!

Blogroll

Custom Web Applications
Showing posts with label Chatterbox. Show all posts

Saturday, June 6, 2009

Spellbinders: Impressabilities - Embossing 2

Today, I will continue to show you how to emboss using Spellbinders' Impressabilities templates.


The cardstocks I am using today are white core cardstocks so when I sand the embossed cardstock, it will enhance the embossed cardstock.

The dimension of finished cardstock is 8.5" x 5.5".


First, I ran the Chatterbox Light Black Solid Cardstock through the Wizard Machine with Impressabilities Paisley Template. For how to build the sandwich, please refer to my previous blog Spellbinders: Impressabilities - Embossing 1.

This is the embossed (front) side of cardstock.


I sanded down the embossed pattern to enhance the embossed design.


This is the debossed (back) side of cardstock.


This is how the debossed pattern looks after sanding.


I repeated the same process with Chatterbox Dark Scarlet Solid Cardstock. After sanding, I cut the scarlet embossed cardstock in half and assemble the card.

Stamped "Congratulations" on a white cardstock and ran it through the Wizard Machine with the 3rd smallest die from Spellbinders Large Standard Circle set.

Used the 3rd smallest die from Spellbinders Large Classic Scalloped Circle set to cut Chatterbox Dark Scarlet Solid Cardstock.

Now I am ready to assemble the card. I pushed the cap paper pin from Around The Block School Paper Pins. through the congratulation circle title before glued it down to the card.

Supplies

Die Sets
- Impressabilities Paisley Template
- Spellbinders Large Standard Circle
- Spellbinders Large Classic Scalloped Circle

Cardstock and Paper
- Chatterbox Light Black Solid Cardstock
- Chatterbox Dark Scarlet Solid Cardstock

Embellishments
- Around The Block School Paper Pins
- Chatterbox Scarlet Decorative Ribbons


Stamp(s) & Ink
- Congratulations stamp from Stampin Up
- Cranberry Crisp ink from Stampin Up

Tools:
- Wizard by Spellbinders or other die cut systems that are compatible with Spellbinders Dies.
- Paper trimmer
- Scissor
- Tapes
- Tim Holtz Sanding Grip Tool

Tuesday, May 26, 2009

Spellbinders: Impressabilities - Embossing 1

Impressabilities are thin metal templates for embossing, debossing, letterpressing or stenciling.

These templates measure 5 3/4" x 4 1/2" to cover an A2 (5 1/2" x 4 1/4") card.

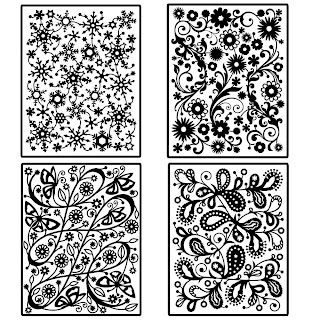
Currently there are 4 patterns available for Impressabilities and they are:
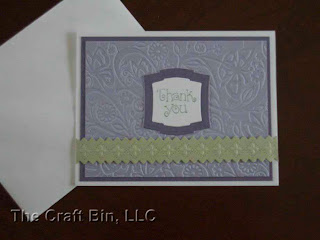


Today I will show you how to emboss using Impressabilities Template to make this 4.25" x 5.5" card.

In the step by step demonstration, I will be using Original Sizzix Press.

But, don't worry, I will list out the sandwich recipe for other machine at the bottom of this blog.
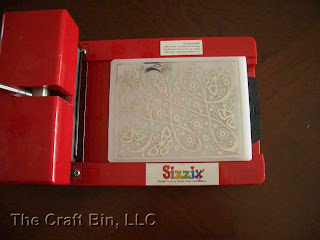


Step 1

To create a sandwich for Original Sizzix Press, place Impressabilities Butterfly Template on Sizzix cutting pad.
Tip: Make sure your cutting pad has never been cut before. Otherwise, cut marks will etch themselves into embossing details.

I actually have 2 cutting pads. One is for cutting and the other one for embossing.
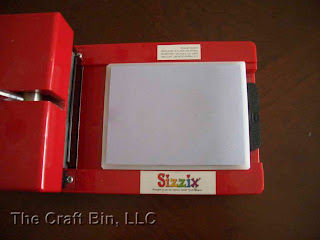


Step 2

Add Chatterbox Light Violet Bazzill Cardstock on top of the template.
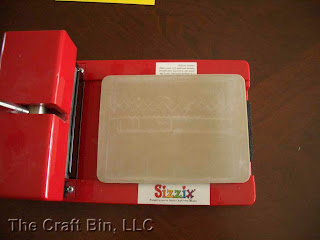


Step 3

Place Tan Embossing Mat on top of the cardstock.
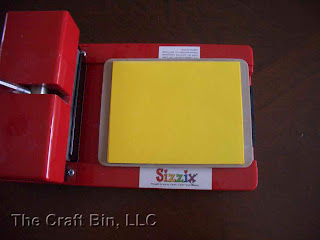


Step 4

Add paper shim on top of Tan Embossing Mat .

Tip: To make a paper shim, use a 12 x 5 piece of paper and fold in half to use as a shim.

Run the sandwich through Original Sizzix Press. You may have to run it through a couple of time for thick cardstock.


Step 5

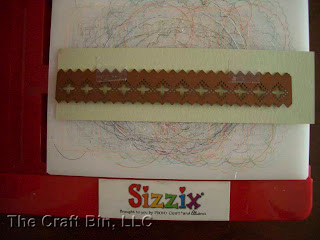
Next I create a strip of border with Pierceabilities Pinking Border Die.

To cut the border, first place Chatterbox Light Spruce Bazzill Cardstock on cutting pat.

Place die on top of paper with cutting ridge side down. I use a couple of small pieces of tape to hold the die in place.

Place the Spellbinders White Spacer Plate on top of Die and run the sandwich through the machine.
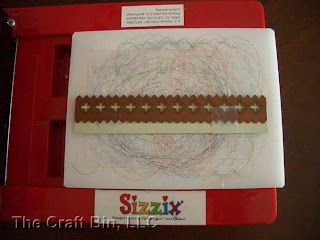


Step 6

Turn the die around and line up the die with cut edge of paper.

Use a couple of short pieces of tape to hold die in place.

Place the Spellbinders White Spacer Plate on top of Die and run the sandwich through the machine again.
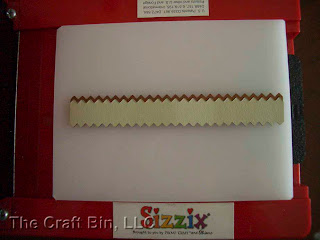


Step 7

If you turn the paper cut, this is how it looks now.

With the cutting ridge facing up, place Tan Embossing Mat on top of paper die and run it through the machine.
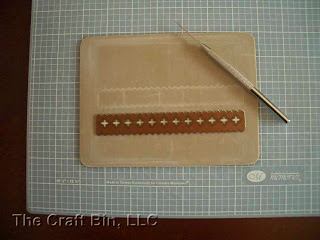


Step 8

Next step is piercing. To add more depth to the holes, you can use Tan Embossing Mat. Make sure you place another mat underneath of Tan Embossing Mat to protect your furniture.

Tips: Hold Pierceability die firmly in place during pricking.
Hold the piercing tool as vertical as possible to prick holes nice and round.
Try and price to the same depth so that the diameter of the holes will be equal.
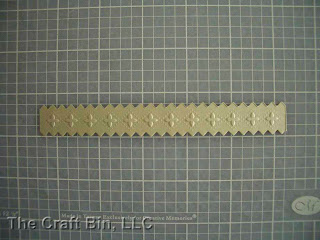


Step 9

This is how the border looks like after piercing is complete.

Stamp Thank You on a white cardstock.

Use the smallest die from Spellbinders Label Two set to cut the white cardstock.

Use the second smallest die from Spellbinders Label Two set to cut Chatterbox Dark Violet Solid Cardstock.
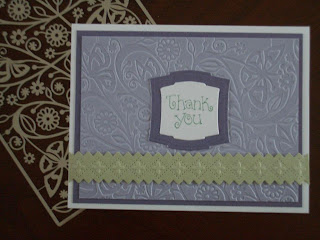


Step 10

Assemble the card.


Supplies


Die Sets
- Impressabilities - Butterfly
- Pierceabilities - 5 1/2" Pinking Border
- Nestabilities - Label Two

Cardstock and Paper
- Chatterbox Light Violet Bazzill Cardstock
- Chatterbox Dark Violet Solid Cardstock
- Chatterbox Light Spruce Bazzill Carstock

Stamp(s) & Ink
- Thank You stamp from Stampin Up
- Garden Green ink from Stampin Up

Tools:
- Wizard by Spellbinders or other die cut systems that are compatible with Spellbinders Dies.
- Paper trimmer
- Scissor
- Tapes
- Piercing Tool


Embossing Sandwich for Spellbinders Wizard
(stack from bottom up)
1. Place first White Mat.
2. Use a 12 x 5 piece of paper and fold in half to use as a shim. Add paper shim on top of White Mat.
3. Place Tan Embossing Mat on top of paper shim.
4. Paper or cardstock of your choice.
5. Place Impressabilities Template on top of paper or cardstock.
6. Place second White Mat on top of Impressabilities Template.
7. Run through Wizard Machine.

Embossing Sandwich for Big Kick by Sizzix
(stack from bottom up)
1. Place large platform down first with all tabs closed.
2. Place Impressabilities Template.
3. Paper or cardstock of your choice.
4. Place TWO Tan Embossing Mats on top of paper or cardstock.
5. Use a 12 x 5 piece of paper and fold in half to use as a shim. Add paper shim on top of Tan Embossing Mats.
6. Place ONE Big Kick acrylic plate on top.
7. Run thru the Big Kick machine.

Embossing Sandwich for CuttleBug by Provocraft
(stack from bottom up)
1. A Plate.
2. Impressabilities Template.
3. Paper or cardstock of your choice.
4. Use 2 or 3 pieces of cardstock to shim.
Cautionary Note: Using more than 3 pieces of cardstock to shim Cuttlebug Embossing sandwich will result in B Plate breakage.
5. Place two acrylic B Plates on top of sandwich.
6. Run thru Cuttlebug machine.

Embossing Sandwich for Big Shot (Black & Pink) by Ellison-Sizzix
(stack from bottom up)
1. Place large platform down first with all tabs closed.
2. Place Impressabilities Template.
3. Paper or cardstock of your choice.
4. Place TWO Tan Embossing Mats on top of paper or cardstock.
5. Use a 12 x 5 piece of paper and fold in half to use as a shim. Add paper shim on top of Tan Embossing Mats.
6. Place ONE Big Shot acrylic plate on top.
7. Run thru the Big Shot machine.

Embossing Sandwich for Revolution by QuicKutz
1. Place Impressabilities Template onto Revolution platform.
2. Place paper or cardstock of your choice.
3. Place Tan Embossing Mat on top of paper or cardstock.
4. Place acrylic embossing mat on top of Tan Embossing mat.
5. Run thru Resvolution matchine.

Sunday, January 4, 2009

"D" is for Daughter

Happy New Year! everyone. How was your holiday? Are you ready for my first post of the year?


For those of you have a daughter, what does your daughter mean to your? Is she a joy bringer? a heart warmer? a memory maker? I am sure she is all that, plus she is your love, right?

Today's page layout is for "D" in an ABC baby girl album.

A couple of things I want to mention:
1. For the phrase, "A daughter is .. a joy bringer, a heart warmer, a memory maker. A daughter is ... love.", I printed it on the back side of vellum paper so the ink will not get smeared easily. Also when you print on vellum paper, make sure you change print option for transparency so less ink will come out. Do not touch the printed vellum paper for a few minutes after print. Otherwise, you will smear the prints.

2. For the lower right hand corner, I took Heidi Swapp's clear extras and painted with red, green and white acrylic paint on the back side. I mixed white with red and green paint separately to make different shades of pink and green. One thing I like about these clear extras is if I mess up the paint, I can wash it off with water and try it again. I hope you will give this a try.


Items used in this layout include:

1. Chatterbox's Villa Memory Building Kit
2. Chatterbox's red and pink ribbons
3. Chatterbox's Olive fuzz stickers
4. Heidi Swapp's Pink Chipboard Alphabet Box
5. Heidi Swapp's clear extras from Runway Collection.

Monday, December 29, 2008

"C" is for Cherished

This is the third page of an ABC album for a cherished baby girl.

In this layout, you can place a 4" x 6" photo at the top.

At the bottom, I first sewed bottom and 2 outer sides and also a straight line between each circle. That way, you can insert 3 smaller photos into the slots.

At the bottom, there is supposed to have a cute phrase of "Your are a treasure to cherish always." But I messed it up by typing "is cherish" instead. But I didn't realize that until now. So if you are going to make this page layout, please don't make the same mistake as me. Have fun!!!!

Items used in this layout include:

1. Chatterbox's Villa Memory Building Kit
2. Chatterbox's Olive fuzz stickers
3. Chatterbox's Olive 3-D stickers
4. Heidi Swapp's Pink Chipboard Alphabet Box
5. Heidi Swapp's red, pink and lemonade felt flowers.


Thursday, December 25, 2008

"B" is for Baby

"Have you ever held a baby, a baby, a baby like this?"

Continue with the baby girl ABC album, this is another cute 12" x 12" page layout I made using Chatterbox's Villa Memory Building Kit, olive ribbons and Heidi Swapp's Pink Chipboard Alphabet Box, large floral and baby chipboard.

Wednesday, December 17, 2008

"A" is for Angel

I have been wanting to make an ABC baby album and finally I got some time to do so. I will share this ABC album with you as I complete them one page at a time and I hope you will be patient with me.

This is 12x12 album made for a baby girl. I started with Chatterbox's Villa Memory Building Kit, which features pink and olive color with floral, stripes and plaid pattern. For the ABC alphabets, I chose Heidi Swapp's Pink Chipboard Alphabet Box. These Chipboard Alphabet are about 2" tall so they will definitely give my pages a pop.

To make the letter "A" stands out more from the pastel background, I built a layered flower from Heidi Swapp's large floral and felt flowers and jeweled brad and use it as the background.

I also tie an angel chipboard to the letter "A" to emphasize "A" is for angel. Because this angel tag is not glued down, you can add a short message to the back of the tag if you want to.

You can place a 4" x 6" photo and a 4" x 4" photo or journaling block. These 2 mats were first cut with Fiskars's Paper Edgers, then sewed together and added pink ribbons.

To tie the olive chipboard alphabets "ANGEL" with pink, I sanded them down a little before applying Stampin' UP! Rose Romance ink around each alphabet.

At the bottom of page, I added a clear die cut wing from Heidi Swapp with a 3-D angel sticker from Chatterbox to start a cute little phrase "Angel is God's whisper in the wind". This phrase was printed on a piece of cardstock cut and embossed with Spellbinder's small rectangle die with a background cardstock cut and embossed with large rectangle die. The clear die cut wing is also inked with the same Stampin' UP! Rose Romance ink in the back. I hope you like this cute baby girl layout. I am sure that it can be easier converted to a baby boy layout by simply changing the color.


Sunday, November 23, 2008

Create 20 Chrismtas Cards in One Night

Can you believe that I made all 20 of these Christmas Cards in one night? Yep, I did. How cool is it to have all your friends and family received different cards from you this Christmas. And I didn't use any stamps, other embellishments or fancy tools for these cards. All the stickers, alphabets, flowers and ribbons are from this Page Kit. The only thing that is not included in this kit is the 8.5" x 11" cream cardstock.


List of supplies and tools for this project:

Cardstock and Paper
- Gazebo Memory Building Page Kit by Chatterbox
- 20 8.5" x 11" cream cardstock

Tools:
- Paper trimmer
- Scissor
- Tapes


Instruction:

1. First, follow the dimensions below and cut 4 of 12" x 12" paper each. So you will have
  • 20 of A with 3.5" x 8.5" dimension
  • 24 of B with 1.75" x 8.5" dimension
  • 16 of C with 0.75" x 8.5" dimension
  • 8 of D with 3.5" x 3.5" dimension


2. Then cut 2 pieces of B with dimension of 0.75" x 8.5" dimension. Now you should have 20 of A and 22 of B and 20 of C.

3. Now you can take 20 of A, B and C to assemble 20 cards. Each card will need one each of A, B and C. Make sure you lay out all 20 combination first before tape it down to the card. It's much easier to switch them now than with tape in the back. Also, remember that these paper are double-sided, so you can flip them over if you think the pattern is too busy. You see, there are just so many different possibilities with these. You will start tape B at the bottom of the card, A at the top of the card and then C to cover the gap between A and B.

4. Cut the ribbons came with the kit to 5" long. Tie a knot and tape them to the bottom of the cards.

5. Use the alphabet stickers came with the kit, make 2 cards with title "joy", 2 cards with "noel" and 1 card with "peace".


6. Download (right click on the image and select "Save Image As...") the 2 images above, and print them on the D (3.5" x 3.5") paper. Make sure you adjust the print size to 3.5" x 3.5". If you have problem print them out on 3.5" x 3.5", you can tape them to a larger piece of paper and them peel them off after printing. Trim them down and use them as titles for the rest of 15 cards. Use brads that came with the kit to attached to the titles.

7. Use stickers and flowers that came with the kit to embellish the cards. Voila, here are 20 homemade Christmas Cards!

Saturday, November 22, 2008

Red, White, Blue Christmas Card

Today, I want to a share a card with you that was made specially for our brave soldiers who can not spend time with their family during holiday season.


Here is the list of supplies and tools you will need to make this card:

Die Set(s):
- Star 5 Die Set by Spellbinders

Stamp(s):
- A Rhonna Christmas Card Stamps by Autumn Leaves

Cardstock and Paper
- 8.5" x 11" white cardstock
- 4.5" x 4.5" blue cardstock
- 4 1/8" x 4 1/8" light blue cardstock
- Enough red, white, blue cardstock to cut 4 red stars, 4 blue stars and 5 white stars.

Embellishment:
- Scarlet Decorative Ribbon by Chatterbox
- Denim Decorative Ribbon by Chatterbox
- Brads by Making Memories

Ink
- Real Red Pigment Ink from Stampin' Up!

Tools:
- Wizard byby Spellbinders or other die cut systems that are compatible with Spellbinders Dies.
- Paper trimmer
- Scissor
- Tapes
- Silver pen


Instruction:
1. I started with the smallest star die from Star 5 Die Set to cut out 4 red stars, 4 blue stars and 5 white stars first. Then assembled them on the light blue card stock to make a star wreath. Tip: I use one of Spellbinders circle dies as a template to draw a circle on the light blue cardstock first so I can make sure that the stars are in a perfect circle. You can use any object that can help you to draw a circle that is about 2.5" in diameter.

2. Attached some Blue Decorative Ribbon and Red Decorative Ribbon to the card with blue brads.

3. I stamped the Happy Holidays on the left side of the card between ribbons. Added some shadow with a silver pen to the stamped image so it stand out more.

4. Attached blue card stock and then the assembled light blue card stock to the card.

5. Added some red brads to the 4 corners of star wreath for finishing touch. Here is a card for our soldiers and wish them a Holiday Holiday!

Friday, November 21, 2008

The "GREEN" Star Christmas Card

Ok, I did promise you that I will show you another Christmas Card from the left over star die cut a few days ago. So here it is. In this card the main theme, Star, is all made of recycle paper. This is the "Green" Star Christmas Card.


Here is the list of supplies and tools you will need to make this card:

Die Set(s):
- Star 5 Die Set by Spellbinders.
- Label 2 Die Set by Spellbinders.

Stamp(s):
- A Rhonna Christmas Card Stamps by Autumn Leaves

Cardstock and Paper
- 8" x 11" cream cardstock
- Some left over scrap paper and a piece of 5" x 5" paper that will coordinate with the scrap
- Left over Silver Star from Shining Star Christmas Card or Silver paper from Creative Memories Metallic Collection.

Embellishment:
- Scarlet Decorative Ribbon by Chatterbox
- Jeweled Brads by Heidi Swapp

Ink
- Real Red Pigment Ink from Stampin' Up!

Tools:
- Wizard by Spellbinders or other die cut systems that are compatible with Spellbinders Dies.
- Scissor
- Tapes
- Silver pen


Instruction:
1. First, I glued all scrap paper on a piece of paper that is large enough for me to cut out a star die cut using the third largest star die from Star 5 die set. I used mostly with shades of green paper and then add a little yellow and red pattern paper.

2. Take the glued paper with the star die and run through Wizard. Then glue it to the Silver Star die cut. If you don't have one, you can use the second largest star die and cut and embossing on a silver paper.

3. I used the largest die from Label 2 Die Set and cut and embossing on a red card stock to pick up the reds in my assembled star. I then use the same die and a template to outline silver border.

4. I stamped the Merry Christmas on the lower left hand corner of the card and used a silver pen to add some shadow to the stamped image to make it stand out more.

5. I added Scarlet Decorative Ribbon on the cream card stock first before attached the label and star die cuts. Finished it with some small sparkle Jeweled Brads from Heidi Swapp. Here is your "Green" Christmas Card.