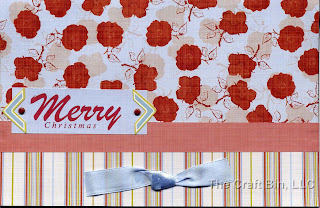
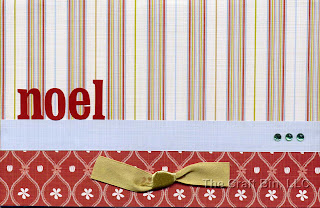
 Can you believe that I made all 20 of these Christmas Cards in one night? Yep, I did. How cool is it to have all your friends and family received different cards from you this Christmas. And I didn't use any stamps, other
  embellishments or fancy tools for these cards. All the stickers, alphabets, flowers and ribbons are from this Page Kit. The only thing that is not included in this kit is the 8.5" x 11" cream cardstock.
List of supplies and tools for this project:
Cardstock and Paper
- Gazebo Memory Building Page Kit by Chatterbox
- 20 8.5" x 11" cream cardstock
Tools:
- Paper trimmer
- Scissor
- Tapes


Instruction:
1. First, follow the dimensions below and cut 4 of 12" x 12" paper each. So you will have
- 20 of A with 3.5" x 8.5" dimension
- 24 of B with 1.75" x 8.5" dimension
- 16 of C with 0.75" x 8.5" dimension
- 8 of D with 3.5" x 3.5" dimension


2. Then cut 2 pieces of B with dimension of 0.75" x 8.5" dimension. Now you should have 20 of A and 22 of B and 20 of C.
3. Now you can take 20 of A, B and C to assemble 20 cards. Each card will need one each of A, B and C. Make sure you lay out all 20 combination first before tape it down to the card. It's much easier to switch them now than with tape in the back. Also, remember that these paper are double-sided, so you can flip them over if you think the pattern is too busy. You see, there are just so many different possibilities with these. You will start tape B at the bottom of the card, A at the top of the card and then C to cover the gap between A and B.
4. Cut the ribbons came with the kit to 5" long. Tie a knot and tape them to the bottom of the cards.
5. Use the alphabet stickers came with the kit, make 2 cards with title "joy", 2 cards with "noel" and 1 card with "peace".


6. Download (right click on the image and select "Save Image As...") the 2 images above, and print them on the D (3.5" x 3.5") paper. Make sure you adjust the print size to 3.5" x 3.5". If you have problem print them out on 3.5" x 3.5", you can tape them to a larger piece of paper and them peel them off after printing. Trim them down and use them as titles for the rest of 15 cards. Use brads that came with the kit to attached to the titles.
7. Use stickers and flowers that came with the kit to embellish the cards. Voila, here are 20 homemade Christmas Cards!


